jGISTools - Sample 1
Running
This sample presents how to use the basic map component - IMapComponent to display a shapefile.
For runing this sample, check the steps outlined in Readme First
Libraries
To use the jGISTools components, add to your project all the jars from the lib directory of the distribution, including the ones from the lib/geotools directory.
You will also need the JAI (Java Advanced Imaging) jars. Download the JAI jars from jai-1_1_3-lib.zip, extract the archive and add the jars to your project.
Usage
To begin using the map component, you will need to create the map model that will hold the data to be rendered. Currently only shapefiles are supported, so you start by creating ShapefileMapModel.
To create a ShapefileMapModel, you will need to specifiy in which CooordonateReferenceSystem (CRS) your map data is. The ShapefileMapModel has a convenient utility method called getCRS(...) that will try to determine the CRS used in the shapefile. If the detection of the CRS fails, getCRS(...) will return null and you will need to build the required CRS manually. Check the Geotools user guide for more information regarding this aspect.
 			String path = args[0];//path to the shapefile to open

 			CoordinateReferenceSystem crs = ShapefileMapModel.getCRS(path);

			//1.2 Check if the CRS could be obtained
			if( crs == null ) {//no CRS :(
				throw new RuntimeException("Could not get CRS for the specified shapefile ! Consider building the CRS manually !");
			}

			//1.3 Now create the model object with the obtained crs
			ShapefileMapModel model = new ShapefileMapModel(crs);
Note that so far we did not specifiy to the map model where our shapefile data is, we have only specified the CRS of the data that will be contained in the map model.
Now that we have our empty map model instance, we can continue creating our map component. To do this, a series of factories will be used.
We start by getting a gui factory for the windowing toolkit that we use. We request a factory that provides components for the Swing framework.
	  		GUIFactoryBuilder factoryBuilder = GUIFactoryBuilder.getInstance();
			IGUIFactory componentFactory = factoryBuilder.getGUIFactory(GuiPlatformType.SWING);
After we obtained the component factory, we create a map component instance. Note that we supply the map model instance created earlier.
IMapComponent mapComponent = componentFactory.createMapComponent(model, null);
The second parameter in the createMapComponent(...) method is an aditional parameter that might be needed by the factory to create the component. For example if the factory was creating components for the SWT platform, the aditional parameter would have been the parent widget for the component being created. However Swing components do not need the parent, so this parameter is not used by the component factory for Swing.
Now we have a fully functional map component, so we can start adding the shapefiles to display. We specify which shapefiles should be displayed using the ShapefileInfo class. This class groups information regarding the location of the map data with styles to be used for rendering. The simplest usage is to create a ShapefileInfo specifying the path to our shapefile.
ShapefileInfo shpInfo = new ShapefileInfo(path);
Now we add the shapefile to our map model by calling:
model.addShapefile(shpInfo);
Note that you can add multiple shapefiles to the same map model instance. The only restriction is that the all the added shapefiles have their data in the same CRS. Also note that we added the shapefiles to the map component by calling methods on the model and not on the map component itself.
After we have added the shapefiles, we initialize the map component by calling initializeMapComponent(...). This method signals to the map co,ponent that we are ready to start using it. Internally this methods allocates resources (threads, timers, off-screen buffers, etc).
mapComponent.initializeMapComponent();
Please note that you may call the initializeMapComponent() anytime, the only restriction being that the map component already has the model specified.
The last step is adding the map component to the main window of the application. To get the toolkit widget of your component, call getWidget(). For the Swing framework, this will return a JComponent instance that can be added to any Swing container.
	  		JFrame frame = new JFrame("HelloMaps demo application !");
			frame.add((JComponent)mapComponent.getWidget(), BorderLayout.CENTER);
			frame.setSize(800, 600);
			frame.addWindowListener(...);
			frame.setVisible(true);
Results
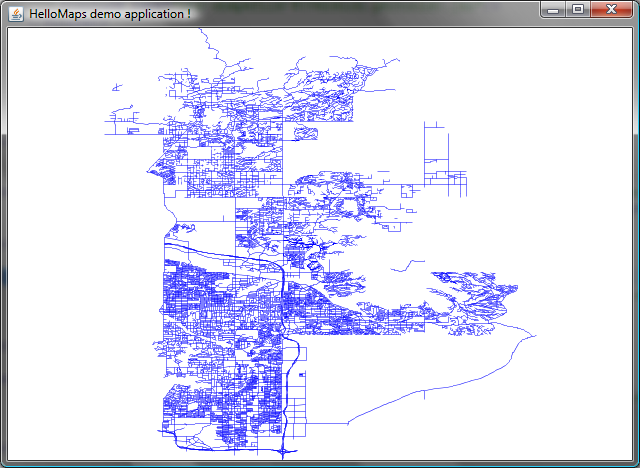
After running the code from this sample, you should get something like the figure below:

By clicking in the window, or using the scroll-whell, one sees that nothing happens, because the map component doesn't have a predefined way to handle user actions. You can write your own tools and set them in the map component or use the ones that are already part of the library.
The next sample will show how to use the map pane, which should be the starting point for most applications. The map pane comes with a set of predefined actions and tools and is very easy to use.
